Table of Contents
Intro
In this post we'll cover how to set up a web-hosted git server that uses Gitea, a Github clone that is written in Go. While this post is not, strictly speaking, research, having your own hosted git server certainly makes it easier to manage research codes and set up organizations to own different bits of code.
Here's an image of a git repository in the finished product:
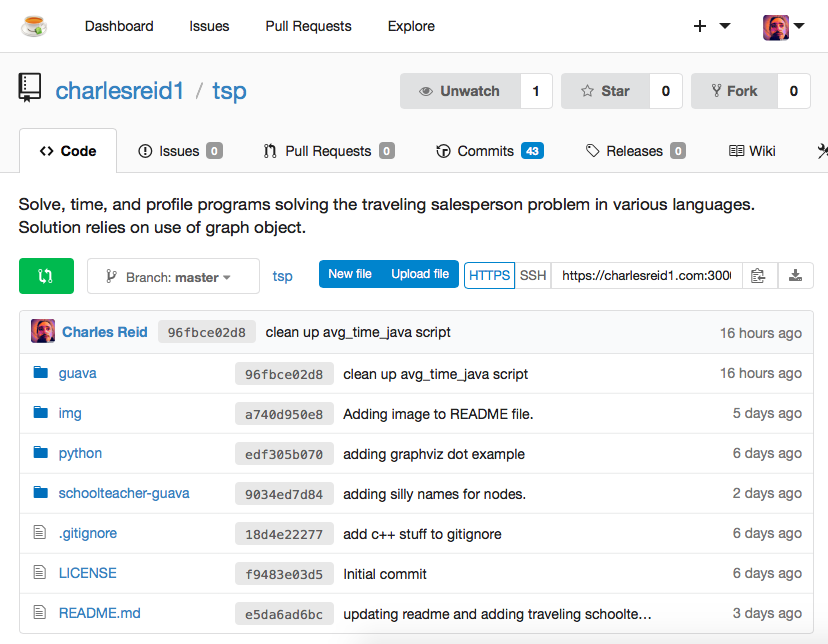
We will start by covering the server configuration for Gitea, and then we'll cover how to use Gitea's git repository.
Running with Gitea
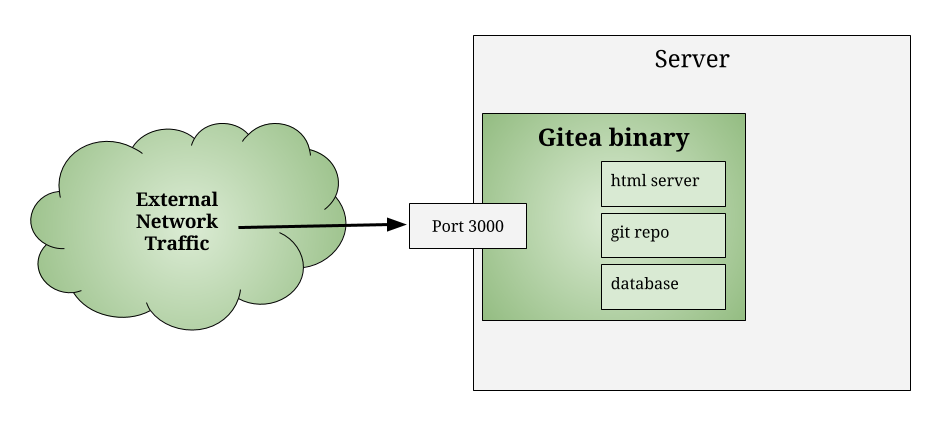
Gitea is a web app for running a self-hosted Github clone. It is implemented entirely in the Go language, so all of the pages that are served up are assembled by the Go binary. The Go binary also has a local instance of git running, and any actions taken through the Gitea web interface are translated, by the Go binary, into actions in the git reopsitory.
Out of the box, Gitea provides all of this functionality, and takes care of all the details, so you don't have to worry about any of this. But if you build it yourself, you can modify the content the binary serves up and the actions it takes.
In this guide, we'll stick to the binary.
Binary or Source
There are some problems with the source code that may make compilation from source impossible. (See charlesreid1.com wiki notes.) The binary version of Gitea is recommended.
Configuring Gitea Directories
Gitea expects a certain directory organization, specifically, a folder for binaries, certificates, a database, git repositories, and the log.
The recommended arrangment is:
/path/to/www/gitea/
   \
    \---------- bin/
     \--------- certs/
      \-------- data/
       \------- repositories/
        \------ log/
Once the files are organized in this way, navigate to the bin directory and (preferrably using tmux or screen to send to background) execute the command:
./gitea web
This runs a setup page on port 3000.
Note that you may or may not need to set your $GOPATH variable:
export GOPATH="${HOME}/gocode"
Go ahead and follow the instructions on the page to get Gitea set up. The gitea.io page has good documentation.
Opening the Firewall
Assuming your port 3000 was closed on the firewall, and assuming you plan to run the gitea service as a public service listening on an external port, you will want to open your firewall to accept incoming traffic on port 3000:
# allow traffic on port 3000
iptables -A INPUT -p tcp --dport 3000 -j ACCEPT
#  to allow forwarding for 3000 to internal LAN
iptables -A FORWARD -p tcp -j ACCEPT --dport 3000 -m state --state NEW
Setting Up and Configuring Gitea Server
To configure gitea, you will use a .ini configuration file contained in:
/path/to/www/gitea/custom/conf/app.ini
Here is an example gitea configuration file. It starts with a header, then has sections for different aspects like databases, the git repository, and the server:
;;;;;;;;;;;;;;;;;;;;;;;;;;;;;;;;;;;;;;;;;;;;;;
;; Example Gitea Config File
;;
;; https://github.com/go-gitea/gitea/blob/master/conf/app.ini
;;;;;;;;;;;;;;;;;;;;;;;;;;;;;;;;;;;;;;;;;;;;;;

APP_NAME = big ugly git repo (BUGR)
RUN_USER = git
RUN_MODE = prod

[database]
DB_TYPE  = sqlite3
SSL_MODE = disable
PATH     = /www/gitea/data/gitea.db

[repository]
ROOT = /www/gitea/repositories
PREFERRED_LICENSES = MIT License

[server]
PROTOCOL     = https
DOMAIN       = yourdomain.com
CERT_FILE    = /www/gitea/certs/cert.pem
KEY_FILE     = /www/gitea/certs/key.pem
SSH_DOMAIN   = git.yourdomain.com
HTTP_PORT    = 3000
ROOT_URL     = https://yourdomain.com:3000
DISABLE_SSH  = false
SSH_PORT     = 22
OFFLINE_MODE = false

[log]
ROOT_PATH = /www/gitea/log
Ultimately, there are many configuration examples available for Gitea, so we won't go into any more detail on that.
For details on how to configure Gitea with HTTPS, see charlesreid1.com/wiki/Gitea.
Let's move on to how we actually utilize Gitea, and focus especially on how to make gitea work in tandem with github and other git servers, instead of being yet another complication in the toolchain.
How To Use Gitea
As we mentioned before, the gitea binary is actually wrapping a git repo, and interactions with the binary (via the web) are translated into actions in that repo. This is important to understand, since it will prevent us from thinking about gitea as a "centralized" server, and get us thinking about gitea as just another computer with a copy of the repository on it.
Understanding how to use gitea also requires correct thinking about how distributed version control works - the way that each collaborator with a copy of the repo can also act as a decentralized git server. In this way, the gitea server becomes just another git client, with some extra frosting on top in the form of a web interface.
Pushing a Local Repo Into Gitea
If you want to move existing local repositories into gitea, it's easy. Remember that with git, everything is local, so all you need to do is push a copy to gitea, and gitea will have the whole repository locally too, including its entire history and any branches and tags that were on your local machine. If you have remotes, you'll need to get local copies of any branches or tags you want from that remote server (covered in more detail below).
The basic steps: * Get everything you want locally (including branches and tags) * Fetch from remotes, if you have any. * Add new remote (gitea) * Push to new remote
The end result will be a gitea repo fully-populated with the project's commit history.
Here are the steps in a bit more detail:
Start by creating a git repository, or cloning an existing one:
mkdir my_git_repo/
cd my_git_repo
git init .
or
git clone http://github.com/mot_pesli/coune_car
Next, create an empty git repo on the gitea server. Sign in using a gitea username and password. There will be a plus sign in the upper right, just like on Github. Click the plus sign, and choose create new repo. Enter the repo name, and a description. Make sure the repo will NOT automatically create a readme or a LICENSE file, as we will be importing all files from another repo anyway.
Once you've got a local copy of the repo with everything you want to push, and you have an empty repository on the gitea server ready for commits, add the gitea repository as a new remote to your local repository.
Example: suppose you have a gitea user named zappa who has created a new empty repo
named linol-aquabus on the gitea server.
Zappa would then cd to the local copy of the git repo,
and add the gitea repository's url as a new remote called gitea:
git remote add gitea https://git.mydomain.com/zappa/linol-aquabus.git

# alternatively,

git remote add gitea https://mydomain.com:3000/zappa/linol-aquabus.git
Now Zappa can push the entire commit history of the current repo to the gitea remote git server:
git push origin gitea

# alternatively,

git push --all origin gitea
If Zappa now visits mydomain.com:3000/zappa/linol-aquabus the entire
contents of the repository and its commit history in gitea's web interface
will be available for browsing.
Copying Repos from Gitub to Gitea
The process for copying Github repositories to Gitea follows the above procedure closely:
git clone https://github.com/user/repo.git
Check out any branches or tags you may want to push to gitea.
Then add the gitea remote to the repo:
git remote add gitea https://git.mydomain.com/zappa/linol-aquabus.git
Now push the contents of the local repository to the remote gitea repository:
git push origin gitea
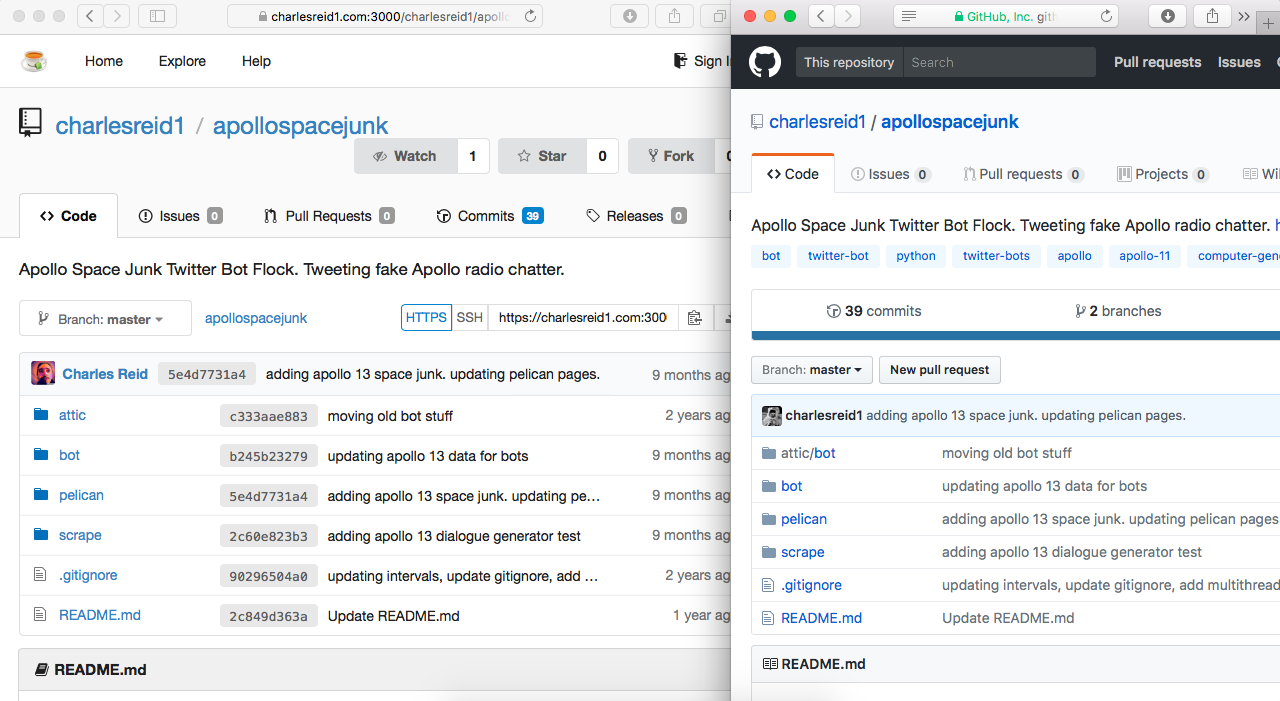
Once this command is executed, the gitea remote will have the entire commit history of the repo, which it will render and display through its web interface. Thus, the entire commit history will be immediately available to browse through gitea.
(Note that information about Github issues or Github user profiles is not stored in the git repo, just as Gitea comments and Gitea user profiles are not stored in the git repo.)
"Moving" Repos from Gitub to Gitea
First, it should be stated up front that you do not have to choose between gitea and github - you can have a copy of a repo on both, frequently push to one or the other, and occasionally update the other as a kind of "mirror."
If you do want to move a repo from github to gitea, remember that github does not "own" the repo, so what you're actually doing is deleting the copy of your repo that lives on github's server.
To move the repo, all you have to do is copy it from github to somewhere else (whether it be your local computer, or to the gitea server), then delete it from github. You will not lose any information about the git repository history. Github does not keep/store that information - git does.
Where to Push Commits: Github or Gitea?
It may seem confusing to use multiple repositories side-by-side, but this is precisely how the designers of git intended it to be used - for decentralized version control.
That means Github or Gitea are not "centralized" servers that "own" the repository, they are merely another instance of git, running on a server, with a local copy of the repo.
Accordingly, if your project exists as a repo on gitea and as a repo on github, it is like the project existing as a repo on your hard drive and as a repo on your collaborator's hard drive - there is no contradiction. If you make changes to your local copy of the repo, you can commit those changes, then push the commits to someone else. In the same way, you can make changes to your local copy of the repo and commit those changes, then push the commits to either gitea, or github, or both - wherever you want.
Backing Up Gitea
It's important to say a few words about backups.
Because Gitea is configured (with the above config file) to use sqlite,
it stores its entire database (the extra "frosting" of stars, wiki pages,
issues, user pictures, etc.) in a single file on disk, in the data/ directory
of the gitea installation.
The git repository is, similarly, a single file on disk, with the entire database
of commits, blogs, commit histories, etc., all contained in the .git directory,
which is contained in the repositories directory of the gitea installation.
That means backing up your git server is as easy as copying the gitea folder. No need to back up a MySQL database or do a funny pants dance to export your database to a proprietary format.
This is another central tenent of git's design philosophy - be fast, pack light, and travel easily.
How Gitea Fits Into Git Patterns
There are many resources on git, and some cover the concept of "git patterns," or templates for how to use git.
Because git is designed to be decentralized, gitea provides a "centralized" node for collaboration within a decentralized system. So you could use gitea to collaborate with your local Team A, and push and pull branches and work on various features together. Then, once Team A has put together a branch they've found useful, they can push it to a different remote server that is more widely accessed.
(Note that this is the logic behind why you need to check out all the branches and tags, locally, that you want to push to the gitea remote server - this allows you the flexibility to only share select branches, so that you might have some branches shared in common wth gitea and github, and other branches only existing on gitea.)
Team B and Team C may use github, and not gitea, to access the project code. The gitea server may for example be a private server on a local network, whereas github is better suited for collaboration. By pushing select branches from the Team A git server, gitea, to the github server, Team B and Team C will then be able to access them from github.
You could also have multiple gitea/gitlab/github enterprise servers for multiple organizations running on git, and they could share a code base by sharing git repositories, commit histories, branches, and so on.
Wrapup
Have a look at the Gitea project, the Go language, git, Github for all the nice software that made this possible.
Then have a look at the finished product at git.charlesreid1.com.
Gitea allows you to create organizations, useful for organizing repos related to particular functionality or platforms. For example, rpi is an organization that owns repositories with scripts and software for raspberry pis, docker is an organization that owns repositories with Dockerfiles, and mac holds Mac-related things.
This organization allows better organization of project code - a dotfiles repository that works for a Mac laptop or a Unix server is not necessarily good for a Raspberry Pi or a Docker container, so code is organized accordingly.
Organizations can also be used to organize project-level code. This git repo is in its beginning phases, but has great potential as a great tool that makes git even more functional and provides one more reason to switch to git.