charlesreid1.com blog

Undergraduate Research Project: Wireless Sensor Networks for Internet of Things Applications (Part 2: The Technologies)

Posted in Wireless

permalink

Undergraduate Research Project (UGR): The Technologies

In this post we'll cover some of the technologies that were used in our South Seatte College undergraduate research project. The project involved an ensemble of different technologies to complete each component of the data analysis pipeline. Some components were planned for, but other components were implemented due to "surprise" challenges that cropped up during the course of the project, while yet more technologies were integrated into the pipeline to avoid extra costs.

Overview of the UGR Project

Before we go further, let's recap what the project was all about. As the research project mentor, I was leading a group of five undergraduate students in a project entitled "Wireless Sensor Networks for Internet of Things Applications." This involved guiding students through the construction of a data analysis pipeline that would utilize a set of sensors, each collecting data about wireless networks in the vicinity, and collect the data into a central database. We then impemented data analysis and visualization tools to analyze the sensor data that was collected and extract meaningful information from it.

There were three major sets of tools used - those used onboard the Raspberry Pi sensors (to extract and transfer wireless data), those used to store and organize the wireless sensor data (NoSQL database tools), and those used to process, analyze, and visualize the data colleted (Python data analysis tools).

The technologies used can be classified two ways:

  • Student-Led Components - the software components of the pipeline that students learned about, and whose implementation was student-led.

  • Backend Components - the software components of the pipeline that were too complicated, too hairy, and/or too extraneous to the project objectives to have students try and handle. These were the components of the project that "just worked" for the students.

Student-Led Components

Raspberry Pi

The Raspberry Pi component presented some unique challenges, with the chief being, enabling the students to actually remotely connect via SSH to a headless Raspberry Pi.

This deceptively simple task requires an intermediate knowledge of computer networking, and coupled with the obstreperous Raspberry Pi, a restrictive college network, the additional complications of students running Linux via virtual machines on Windows (all of the students were using Windows)... It ended up taking more than a month to be able to consistently boot up the Pi, remotely SSH to the Pi, and get a command line using either a crossover cable or a wireless network.

Part of this was induced by hardware, but part was due to unfamiliarity with SSH and Linux, the problems that constantly cropped up ("X is not working in the virtual machine") that were trivial for me to solve, but enigmas for the students, who often did not possess Google-fu.

Question Skills

This last point is subtle but important: the simple skill of knowing what questions to ask, and how to ask them, be they questions asked of a machine or a person or a data set, was one of the most important skills the students gained during this process. These skills go beyond the usual computer science curriculum, which consists of learning structured information in terms of languages and functionality, and require students to solve unstructured problems that are complex - so complex, they simply do not care about languages or functionality.

The flexibility to use many tools was a key element of this project, and a principal reason to use a scripting language (Python) that was flexible enough to handle the many tasks we would be asking of it.

A word about networking issues that the students had connecting to the headless Raspberry Pis:

  • Issues were due to a combination of hardware and networking problems

  • Many issues required multi-step workarounds

  • Workarounds introduced new concepts (DHCP, subnets, IP configuration schemes, IPv6)

  • Each new concept introduced led students to feel overwhelmed

  • Students had a difficult time telling what steps were "normal" and which were esoteric

  • There is a lot of documentation to read - especially difficult for non-English speakers

Each of the multitude of problems students experienced arose from different aspects of the machines. Each problem (networking, hardware, physical power, cables, networking, packet dropping, interfaces, incorrect configuration, firewalls) led to more concepts, more software, more commands.

It can be difficult to troubleshoot networking and hardware issues. It is even more difficult to explain the problem while you are troubleshooting it, and also explain things are important and that students should learn more about, versus some concept that is of questionable usefulness. (Case in point: regular expressions.) On top of that, it is difficult to constantly make judgment calls about what things are important, how important they are, and also helping students not to feel overwhelmed by all the things they don't know yet.

All the while, you are also teaching Google-fu. Did I mention that many of the students do not speak English as their first language?

Aircrack/Airodump

Once the students had reached the Raspberry Pi command line, we moved on to our next major tool - the aircrack-ng suite. This was a relatively easy tool to get working, as it was already available through a package manager (yet another new concept for the students), so we did not waste much time getting aircrack operational and gathering our first sensor data. However, to interpret the output of the tool required spending substantial time covering many aspects of networking - not just wireless networks, but general concepts like packets, MAC addresses, IP addresses, DHCP, ARP, encryption, and the 802.11 protocol specification.

Initially I had thought to use a Python library called Scapy, which provides functionality for interacting with wireless cards and wireless packets directly from Python. My bright idea was to use aircrack to show students what kind of information about wireless networks can be extracted, and to write a custom Python script that would extract only the information we were interested in.

Unfortunately, the complexity of Scapy, and the advanced level of knowledge required of users (even to follow the documentation), meant the tool overwhelmed the students. We wound up practicing putting wireless USB devices into monitor mode from the command line, and starting the wireless network signal profiling tool.

The approach we adopted was to collect wireless network data using aircrack-ng's airodump-ng tool, and to dump the network data at short intervals (15 seconds) to CSV files. These CSV files were then post-processed with Python to extract information and populate the database.

By the end of the first quarter of the project, we were able to utilize airodump-ng to collect wireless network data into CSV files, and parse the data with a Python script.

Pi CSV Files

Further complicating the process of collecting wireless network data from Raspberry Pis was the fact that we were gathering data from the Pis in a variety of different environments - most of which were unfamiliar, and would not reliably have open wireless networks or networks that the Pi was authorized to connect to. Even on the South Seattle campus, the network was locked down, with only HTTP, HTTPS, and DNS traffic allowed on ports 80, 443, and 53, respectively.

This meant we couldn't rely on the Pis making a direct connection to the remote server holding the central database.

Instead, we utilized rsync to synchronize the CSV files gathered by the Pi with the remote server, and we offloaded the process of extracting and analyzing data from the CSV files to a script on the remote server.

That way, the Pis gather the raw data and shuttle the raw data to the remote server (whenever it is available), and the data extraction and analysis process can be performed on the raw data in the CSV files as many times as necessary. If the analysis required different data, or needed to be re-run, the process could simply be updated and re-run on the databae server, with the Raspberry Pi removed from the loop.

NoSQL Database

We needed a warehouse to store the data that the Raspberry Pis were gathering. The aircrack script was dumping CSV files to disk every 15 seconds. Rather than process the data on-board the Raspberry Pi, the script to extract and process data from the CSV files was run on the computer running the database.

This is a best practice I learned form experience:

  • Extract and process the sensor data on-premises (i.e., near or where the data is stored)

  • Keep the original, raw data whenever possible, transport it to the data storage

  • Assume the components of your pipeline will be unreliable or asychronously available

  • Build the pipeline to be robust and handle failures.

We used a cheap, $5/month virtual private server from Linode to run the database. The database technology we chose was MongoDB, mainly because it is a ubiquitous, open-source, network-capable NoSQL database. The NoSQL option was chosen to give students flexibility in structuring the database, and avoid the extra pain of making a weakly-typed language like Python talk to a strongly-typed database system like SQLite or PostgreSQL (which would raise so many questions from students about what is "normal" or "not normal" that I would start to feel like the parent of a bunch of teenagers).

Think of the long-term influence that research mentors can have: simply by showing students how to use vim, and not emacs, I have set them on the path to enlightenment.

We ran the database on the server, but conceptualizing the database was difficult for the students. To this end, I set up an instance of Mongo Express, which provided a password-protected, web-based interface for administering MongoDB that enabled the students to deal with and visualize information more easily.

MongoDB also provided Python bindings via PyMongo, and it was all available for students to install on their local virtual machines and experiment with basic database operations. The MongoDB documentation provides some good examples.

The main struggle that students had was transferring what they had learned about wireless signals and aircrack to the database. Knowing what questions to ask the database proved to take most of their time.

Backend components

During the process of getting each component working, the project occasionally encountered difficulties. The chiefest among these was the fact that the wireless network at our college allowed traffic only on ports 80, 443, and 53, meaning SSH, Rsync, and MongoDB traffic would not make it past the school's firewall.

Stunnel

I have written about Stunnel before on this blog, and have some notes on Stunnel on the charlesreid1.com wiki. This tool proved invaluable for overcoming some of the difficulties on the back-end for the Raspberry Pis.

To allow the Raspberry Pis to securely send data to the database server, I wrote a script that would run on boot and would look for a list of trusted wireless networks, connect to them, and establish an stunnel connection with the remote database server. The script then used rsync over stunnel to synchronize any raw data collected by the Raspberry Pi with the remote database server.

This also satisfied the criteria that the data pipeline be robust and capable of handling failure - this system used stunnel to punch out of a restrictive firewall, and rsync handled comparisons of raw data on the remote and local ends to ensure that only the minimum possible amount of data was transferred between the two. The raw data was plain text and consisted of text files of modest size, making the job easy for rsync.

This was implemented in a boot script, so one simply connected one of the Raspberry Pis to a portable power source (battery pack), and the Pi would look for networks that it trusted, join those networks, and make an stunnel connection over the network to transfer its data (CSV files) to the database server.

Virtual Private Server

Another bit of infrastructure that was provided on the back end was the virtual private server from Linode, so that the students did not have to find a workaround to SSH out of the school's restrictive firewall. A domain for the server was also purchased/provided.

Docker

The virtual private server ran each service in a Docker container - stunnel, MongoDB, MongoExpress, and the long list of Python tools needed to run the Jupyter notebooks for data analysis.

Each Docker container exposed a particular port, making it accessible at an appropriate scope, and by connecting containers to other containers, each component could also seamlessly communicate. Thus one Docker container ran the MongoDB, while another container ran MongoExpress, which established a connection to the MongoDB container.

Using Docker was not strictly necessary, but it was a good opportunity to learn about Docker and get it set up to help solve real-world infrastructure and service problems.

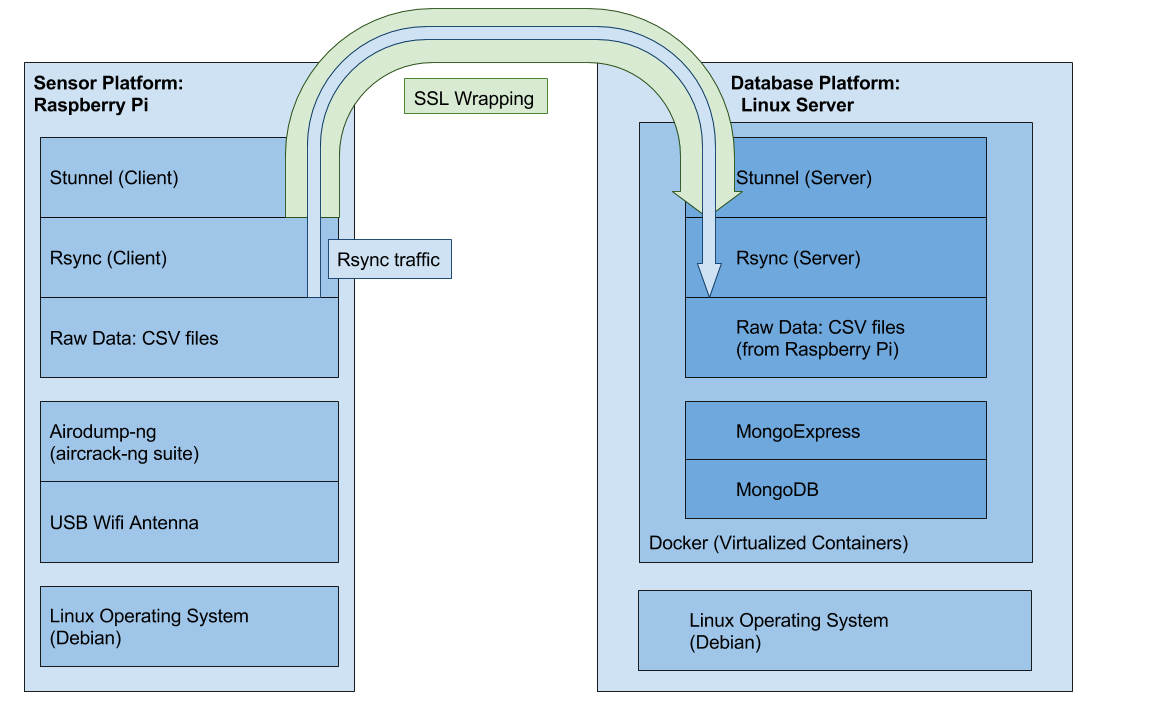
Technologies Flowchart

The following flowchart shows the technology stack that was used to coordinate the various moving parts between the Raspberry Pi clients and the remote database server.

UGR Wifi Schematic

Tags:    wireless    security    undergraduate research project    stunnel    SSH    aircrack    mongodb    python    jupyter    linux    raspberry pi   

Undergraduate Research Project: Wireless Sensor Networks for Internet of Things Applications (Part 1: The Project)

Posted in Wireless

permalink

Table of Contents:

Overview of the Undergraduate Research (UGR) Project

South Seattle UGR Project

For the past year, in addition to my duties as a computer science and math instructor at South Seattle College, I have served as a research mentor for an NSF-funded undergraduate research project involving (off-and-on) five different South Seattle students - all of whom have expressed interest in transferring to the University of Washington's computer science program after they finish at South Seattle College.

The students have various levels of preparation - some have taken calculus and finished programming, while others are just starting out and have no programming experience outside of "programming lite" languages like HTML and CSS.

But it's also been an extremely rewarding opportunity. I have gotten the chance to kindle students' interests in the vast world of wireless security, introduced them to essential technologies like Linux, helped them get hands-on experience with NoSQL databases, and guided them through the process of analyzing a large data set to extract meaningful information - baby data scientists taking their first steps.

These are all skills that will help equip students who are bound for university-level computer science programs, giving them both basic research skills (knowing the process to get started answering difficult, complex questions) and essential tools in their toolbelt.

Two students who I mentored as part of a prior UGR project last year (also focused on wireless networks and the use of Raspberry Pi microcomputers) both successfully transferred to the University of Washington's computer science program (one in the spring quarter of 2016, the other in the fall of 2016). Both students told me that one of the first courses they took at the University of Washington was a 2-credit Linux laboratory class, where they learned the basics of Linux. Having already installed Linux virtual machines onto their personal computers, and having used technologies like SSH to remotely connect to other Linux machines, they both happily reported that it was smooth sailing in the course, and it was one less thing to worry about in the process of transferring and adjusting to the much faster pace of university courses.

Engineering Design Project

The project was entitled "Wireless Sensor Networks for Internet of Things Applications," and was intended to get students introduced to the basic workflow of any internet of things system: a sensor to collect data, a wireless network to connect sensors together, a warehouse to store data collected from sensors, and a workflow for analyzing the data to extract meaningful information.

The focus was to implement a general workflow using tools that could extend to many internet of things applications, be they commercial, residential, or industrial.

However, the NSF grant provided only a modest amount of funding, intended to go toward stipends to pay students and mentors a modest amount during the quarter, with only modest amounts of money for basic equipment. (We were basically running a research project on a $100 budget.)

That meant the project had to be flexible, scrappy, and run on a shoestring budget. This meant we were limited to cheap, off-the-shelf technologies for the sensors, the sensor platform, and the back-end infrastructure. Two technologies in particular lent themselves nicely to these constraints:

  • Wireless USB antennas - USB wifi dongles are cheap ($10), and the ubiquity of wireless networks and wifi signals meant this would provide us with a rich data set on the cheap.

  • Raspberry Pi - the Raspberry Pi is a credit-card sized microcomputer that runs a full stack Linux operating system. With the low price point ($30) and the many free and open-source tools available for Linux, this was a natural choice for the sensor platform.

The result was a set of wireless sensors - Raspberry Pis with two wireless antennas - one antenna for listening to and collect wireless signal data in monitor mode, and one antenna to connect to nearby wireless networks to establish a connection to a centralized data warehouse server.

Project Components: Extract, Store, and Analyze

The wireless sensor network project had three major components:

  • Extract - using a wireless USB antenna, the Raspberry Pi would listen to wireless signals in the area, creating a profile of local network names, MAC addresses, signal strengths, encryption types, and a list of both clients and routers. Students used the aircrack-ng suite to extract wireless signal information.

  • IMPORTANT SIDE NOTE - students also learned about wiretapping laws and various legal aspects of wireless networks - the difference between monitoring ("sniffing") wireless traffic versus simply building a profile of wireless traffic.

  • Store - students learned about NoSQL databases (we used MongoDB) and set up a NoSQL database to store information about wireless signals. This also required some basic Python programming, as the wireless signal information was exported to a large number of CSV files and had to be programmatically collated and extracted.

  • Analyze - the pinnacle of the project was in the analysis of the wireless signal data that was captured. Students ran several "experiments," collecting wireless signals for 2 hours using a portable battery and a Raspberry Pi with wifi dongles. By running experiments under different conditions (at the college library, at a coffee shop, on a bus), a diverse set of data was gathered, allowing students to extract meaningful information about each experiment from each data set.

The Internet of Things: Not Just a Buzzword

One of the biggest challenges starting out was in getting the students into the right "mindset" about the Internet of Things. This was a challenge that I did not forsee when I came up with the project title. As a chemical engineer working on natural gas processing at a startup company, I knew the value of creating wireless infrastructure to extract data from sensors, throw it into a giant bucket, and utilize computational tools to analyze the data and extract information from it.

But the students involved in the project had no exposure to this kind of workflow. To them, the Internet of Things meant toasters and TVs that were connected to the internet, so they were expecting a design project in which we would make a prototype consumer device intended to connect to the internet.

Further complicating things was the fact that we were focusing on building a data acquisition system - a data analysis pipeline - a workflow for extracting, storing, and analyzing sensor data. We were not focused on the specific types of questions that our specific type of data could answer. This was a bit puzzling for the students (who could not see the intrinsic value of building a data analysis pipeline). Much of their time was spent struggling with what, exactly, we were supposed to be doing with the data, and getting past a contaminated, consumer-centric view of the term "Internet of Things."

It was, therefore, a major breakthrough when one of the students, as we were diving deeper into the data analysis portion, utilizing Python to plot the data, quantitatively analyze it, and better understand it, told me, "Looking back, I realize that I was thinking really narrowly about the whole project. I thought we were going to build a 'smart' device, like a business project. But now I realize our project has a bigger scope, because of the analysis part."

That, in a nutshell, was precisely the intention of the project.

University of Washington Undergraduate Research Symposium

Next week the students present the culmination of their research project at the University of Washington's Undergraduate Research Symposium, where they will have a poster that summarizes their research effort, the results, and the tools that were used.

It is clear to anyone attending the Undergrad Research Symposium that community college students are among the minority of students who are involved in, and benefiting from, research projects. The intention of most of the projects showcased at the symposium is to launch undergraduate students into a graduate level research career and prepare them to hit the ground running, and have a stronger resume and application, when they have finished their undergraduate education and are applying to graduate schools. Many of the research posters at the symposium showcase research using expensive equipment, specialized materials and methods, and complex mathematical methods. Many of the students are mentored by world-class research professors with deep expertise and small armies of graduate and postgraduate researchers.

Despite our research efforts being completely outmatched by many of the undergraduate researchers from the University of Washington (out-funded, out-manned, and out-gunned), our group managed to pull together a very interesting and very ambitious design project that collected a very rich data set. The students were introduced to some useful tools and fields of computer science (wireless networks, privacy and security, embedded devices, databases, Linux), and exposed students to a totally new way of thinking about the "internet of things" that allows them to move beyond the shallow hype of internet-connected toothbrushes. The students have developed the ability to build a data pipeline that could be used by a company to address real, significant problems and needs around data.

All in all, this was an extremely worthwhile, high-impact project that's equipping the next generation of computer scientists with the cognitive tools to anticipate and solve data problems, which (as hardware becomes cheaper and embedded devices become more ubiquitous) are problems that will only become more common in more industries.

The Poster

Here's a rough draft of the poster we will be showing at the UGR symposium:

UGR Poster

Tags:    wireless    security    undergraduate research project    stunnel    SSH    aircrack    mongodb    python    jupyter    linux    raspberry pi   

Stunnel

Posted in Security

permalink

Introduction

What Does Stunnel Do?

Stunnel is a tool for creating SSL tunnels between a client and a server.

Creating SSL connections is a general task that is very useful. In particular, any packet of any protocol can always be wrapped in an additional SSL layer, with packets embedded within packets, so this means you can wrap arbitrary traffic protocols in SSL using Stunnel.

Stunnel requires a client and a server on either end of the tunnel.

This writeup assumes access to both the server and the client. If you don't have access to the client, the server certificate needs to be signed by a certificate authority that the client trusts. You can either:

  • Shell out big bucks for a certificate signed by a certificate authority company, thereby contributing to the ongoing racketeering of said companies;

  • Use a LetsEncrypt certificate, signed by a certificate authority for free; or

  • Use a self-signed certificate and install the certificate authority onto the client computer.

(These are all difficult and confusing processes, compounded by OpenSSL's lack of documentation and a proliferation of incorrect terminology. Good luck.)

How Does Stunnel Work?

The client stunnel instance will encrypt traffic, and the server stunnel instance will decrypt traffic.

When encrypting traffic, stunnel accepts incoming traffic by listening on a port (almost always a local port). It will wrap the traffic in an encrypted SSL layer (TCP wrapping) using the SSL certificate/key that is shared between the client and the server. The client then sends out the encrypted traffic over an external connection, and on to the stunnel server.

When decrypting traffic, stunnel will listen on an external connection for incoming, encrypted SSL traffic. It will use its SSL certificate/key to decrypt the traffic and unwrap the SSL layer. It will then forward this traffic on to another (usually local) port.

Stunnel flowchart schematic

Setting Up an Stunnel Server

Stunnel servers can listen on any port, and the port you choose depends on the application. The configuration we're showing here is intended to bypass a network that is tightly controlled and locked down except for HTTP and HTTPS traffic (ports 80 and 443).

Consider an example of connecting a local service on local port 8443 (not open to the outside world) to an stunnel server listening on port 443 (open to the outside world).

stunnel will listen on port 443, open to external traffic, for SSL-encrypted stunnel traffic. This means that only stunnel can listen on 443 (so this cannot be a server for an HTTPS web site - if a user points their browser to https://yourstunnelserver.com stunnel will not understand the HTTPS request and will discard it). We can use stunnel on any port that we want, but communicating between stunnel clients and servers on port 443 allows us to disguise arbitrary traffic (HTTP, HTTPS, SSH, database, etc.) as legitimate HTTPS.

This is very useful if we have a firewall that is actively inspecting the type of traffic inside of packets, and dropping packets with particular protocols like SSH or OpenVPN. By wrapping that traffic in an SSL layer, there is no way for the firewall to inspect the contents of the packet, so it just looks like ordinary HTTPS traffic. The firewall can't decrypt the packet contents, so it doesn't know if you are visiting your bank, checking your email, or sneaking SSH/OpenVPN traffic through the firewall.

(Note that other services like Iodine allow you to do similar things with other protocols, like disguising network connections using encrypted DNS on port 53.)

Typically, stunnel is forwarding that traffic on to a local port, something like 8443. (The common scenario is if you have a service only exposed to LOCAL traffic from localhost or 127.0.0.1 and not bound to an EXTERNAL ip address like 0.0.0.0).

Charlesreid1.com Resources for Stunnel Servers

The charlesreid1.com wiki has an extensive guide to setting up an Stunnel server:

The charlesreid1.com git server has several repositories with configuration files for setting up an stunnel server:

  • d-stunnel repository - repo containing Docker configuration files, for creating a Docker container that runs an stunnel server. This repository contains example stunnel configuration files for running a number of different protocols over stunnel (ssh, http, and rsync).

Setting Up an Stunnel Client

Running an stunnel client requires installing stunnel and setting up a configuration file just like if you were setting up an Stunnel/Server, except swapping the accept and connect ports, since we want the client to accept local traffic (e.g., on port 8443) and send it on to the server that it connects to with SSL (e.g., on port 443).

Charlesreid1.com Resources for Stunnel Clients

The charlesreid1.com wiki has an extensive guide to setting up an Stunnel client:

The charlesreid1.com git server has several repositories with configuration files for setting up an stunnel client:

Example Protocols

One of the most beautiful aspects of networking is that packets can be wrapped within other packets - so theoretically it can be packets all the way down. This allows us to use stunnel's SSL TCP wrappers to wrap just about any traffic we want. This means we can run various services (encrypted or not) through stunnel, including but not limited to:

  • SSH (secure shell)

  • SCP (secure copy)

  • OpenVPN (virtual network)

  • Rsync (file transfer)

  • MongoDB (NoSQL database)

  • Redis (local-only NoSQL database)

While stunnel has a few pre-configured services that it can deal with, users can also define their own custom protocols, over whatever port they please.

The charlesreid1.com wiki details stunnel configuration for all of the above protocols, excepting MongoDB and redis. Here are links to pages specifying how to configure stunnel for each protocol:

The Rsync over stunnel page, in particular, details the steps needed to define your own custom protocol and have stunnel wrap it in an SSL layer correctly.

Stunnel with Docker

Docker is a useful way of managing services in a self-contained and reproducible manner. Running stunnel through a Docker container is surprisingly easy: once you've installed stunnel into the docker container, you just need to map the incoming port (containing incoming encrypted traffic from the client, linked to the external network interface) to the outgoing port (containing decrypted traffic from stunnel, linked to a local-only service on a closed port).

The charlesreid1.com wiki details how to create set up SSH over stunnel at the following page: * charlesreid1.com/wiki/Stunnel/Docker

The charlesreid1.com git server has an stunnel docker repository with configuration files for running a Docker stunnel server, along with several example stunnel server configuration files for handling protocols like rsync, ssh, and http: * d-stunnel repository

Troubleshooting Stunnel Connections

In the d-stunnel repository is a document called DEBUGGING.md that contains a number of techniques for debugging an stunnel connection.

Here is the direct link to DEBUGGING.md.

The techniques covered include:

  • Configuring stunnel to run in the foreground (print log messages to console instead of to log file)

  • Configuring stunnel to output debugging information

  • Poking the stunnel server with telnet

  • Inspecting open ports with nmap

  • Watching /var/log/syslog for activity

See DEBUGGING.md for details.

References

  1. "Stunnel". Charlesreid1.com wiki. 30 April 2017. <https://charlesreid1.com/wiki/Stunnel>

  2. "Category: Stunnel". Charlesreid1.com wiki. 30 April 2017. <https://charlesreid1.com/wiki/Category:Stunnel>

  3. "Stunnel/Server". Charlesreid1.com wiki. 30 April 2017. <https://charlesreid1.com/wiki/Stunnel/Server>

  4. "Stunnel/Client". Charlesreid1.com wiki. 30 April 2017. <https://charlesreid1.com/wiki/Stunnel/Client>

  5. "Stunnel/Docker". Charlesreid1.com wiki. 30 April 2017. <https://charlesreid1.com/wiki/Stunnel/Docker>

  6. "Stunnel/Certificates". Charlesreid1.com wiki. 30 April 2017. <https://charlesreid1.com/wiki/Stunnel/Certificates>

  7. "Stunnel/Rsync". Charlesreid1.com wiki. 30 April 2017. <https://charlesreid1.com/wiki/Stunnel/Rsync>

  8. "Stunnel/SSH". Charlesreid1.com wiki. 30 April 2017. <https://charlesreid1.com/wiki/Stunnel/SSH>

  9. "Stunnel/Scp". Charlesreid1.com wiki. 30 April 2017. <https://charlesreid1.com/wiki/Stunnel/Scp>

  10. "Stunnel/OpenVPN". Charlesreid1.com wiki. 30 April 2017. <https://charlesreid1.com/wiki/Stunnel/OpenVPN>

Tags:    stunnel    SSL    encryption    SSH    networking    OpenVPN   

March 2022

How to Read Ulysses

July 2020

Applied Gitflow

September 2019

Mocking AWS in Unit Tests

May 2018

Current Projects

November 2017

A Hard(y) Math Problem